Sashiko - '刺し子’
Step-by-step explanations how to fix a garment using Sashiko and Japanese techniques. This blog features two Sashiko techniques (one explained and one in a step-by-step video)

What is Sashiko
An ancient Japanese technique used to mend and repair worn out or damaged garment. The idea of Sashiko is to enhance the imperfections of a garment whilst making it stronger and more durable and create new designs to a garment. It involves running stitches that can have different patterns and designs. Because each Sashiko is unique, there is no rule to how it should look or the designs- which gives everyone a really nice chance to make it personal.


About me
My name is Chi, I’m seventeen years old and am an A level student studying: Fashion and Textiles, Photography and Sociology. Im really interested in fashion as well as sustainability and how we can be more circular and environmentally friendly with our fashion. I found out about Tamay & Me at a fashion sustainability talk about ‘Localism vs Globalism’ where I heard about the story behind the clothes made at Tamay & Me. The care behind each garment and the focused element of slow fashion. I’m also half Japanese and want to introduce the technique of Sashiko to you as a way to rework existing items of clothing or repair damaged items of clothing.
Not only does it personalise the garment and repair it at the same time; Sashiko extends the life of the garment. The process of repairing and reworking gives a new life to an otherwise damaged piece of clothing. In an age where climate change impacts everything we do, it's so important to try and make our actions and practices more circular and repair what we already have.
Whilst the idea of Sashiko might seem incredibly complex and daunting- in reality it is very simple!
All you need is a needle, some thread, some fabric (if you are covering a hole or patching over something)- some optionals are an embroidery hoop, chalk and a ruler (to mark up the fabric) and Sashiko needles (basically a thick needle- but any will do!)

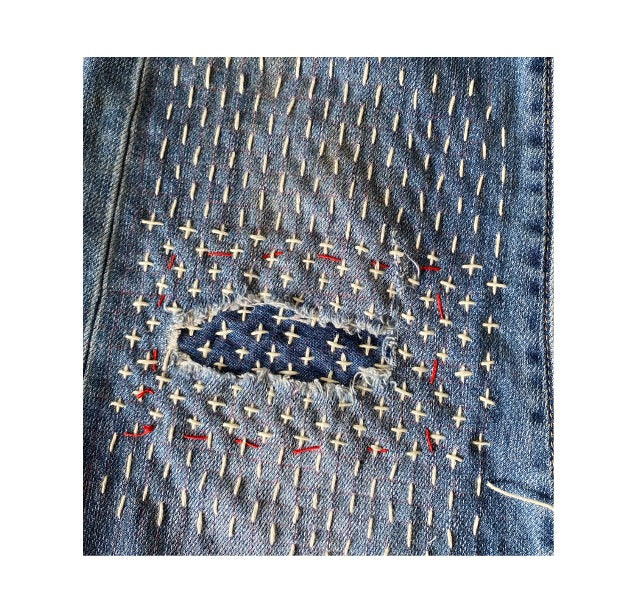
Covering a hole
First, choose a fabric that will cover the hole- then decide if the fabric will go underneath the fabric or as a patch on top of the fabric- this can be cut into different shapes. The patch of fabric is then placed underneath the hole.


-Secure the patch into place- for example behind the hole. First use pins to secure the fabric then tack the fabric together using a contrast thread (this is to hold the fabric together and doesn’t have to be neat.


Then decide what pattern you would like to create- this can be as simple as using running stitch lines or using more complicated patterns- like the picture below. The pattern can be drawn on using chalk or a fabric pen using a ruler or tracing a pattern for accuracy. (Remember, there are no rules to what pattern or technique to use as long as the fabric is being reinforced/decorated in the way that you want!)


In this example, I’m doing a Jujizashi stitch ‘十じざし’(10 cross stitch- because a cross in Japanese kanji means 10) . The grid consists of horizontal and vertical lines that are 5mm apart. It's very important to draw these evenly as it makes the sewing a lot easier. I used the image below as a reference (from the book ‘the ultimate sashiko sourcebook’ by Susan Briscoe)

Using the chosen thread, start using a running stitch to sew over the area of the hole and around the fabric. The aim is to secure the fabric into place but you can also create a pattern or a design onto the garment.


When sewing, each stitch should be the length of one grid- make sure to stitch every other square. When moving to the next row, the stitch needs to start on the other row so that the stitches and rows alternate (as shown in the picture on the left). When moving to the next row, its also important to ensure the thread isn’t pulled tight as there would be no room for movement.


When all the vertical rows are done, start stitching the horizontal lines. This can be seen in the reference image above, but the width where the thread crosses over can be any length.
Above is the finished thing! The diamond pattern on the left is another technique you can use with Sashiko!
There is a link below for a video showing the process of the diamond pattern.